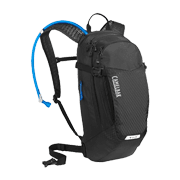
1-Day Assault Pack Guide
Pack Philosophy
A 1-day assault pack is not a small ruck. It is the bridge between the fighting load on your belt or carrier and the larger sustainment bag that stays in the truck, cache, or staging area. The Garand Thumb day-pack videos and Mike Glover mobility-bag example all come back to the same rule: pack by survival category, then cut weight until every item has a job inside the next 24 hours. The pack itself should be small enough that you will actually keep it on you, but structured enough to carry water, trauma supplies, insulation, tools, and admin without turning into a loose sack.
Pack And Water
The build starts with a compact hydration-capable assault pack. The CamelBak HAWG pattern works because the water rides close to the spine and still leaves room for a flat admin layer, a small food block, and a weather layer. A bladder is fast while moving, but a hard bottle gives you a durable backup for mixing electrolytes, collecting questionable water, or handing water to somebody else. The filter is a hedge: it is not there because you plan to purify creek water on a range day; it is there because the pack is supposed to keep working when the day stops going to plan.
Medical And Sustainment
Medical is deliberately a real trauma set, not a box of adhesive strips. The tourniquet, pressure dressing, hemostatic gauze, NPA, gloves, and tape follow the same IFAK logic used in the dedicated medical guides, but the pack gives you enough space to stage them where either hand can reach them. Food is simple: a ration or bar block for one day, plus electrolytes because heat and movement punish small packs faster than people expect. Shelter is equally lean: poncho, emergency bivvy, and a packable layer are enough to prevent a short halt or forced overnight from becoming exposure.
Tools, Comms, And Admin
The tool layer is intentionally boring. Cordage, a multi-tool, fixed blade, red-capable headlamp, pace beads, and face camouflage cover repair, light discipline, field marking, and basic fieldcraft without trying to turn a day pack into a bushcraft kit. A budget handheld radio and a small power bank give the pack a communications floor. Admin is map, compass, waterproof notes, marker, and chemlights; those items matter because coordination and marking are usually needed before the impressive gear is.
Packing Order
Load the day pack so the most urgent categories are accessible first. Medical should sit in a top pocket, outer pocket, or tear-away insert where a bystander can find it without unpacking the whole bag. Water rides close to the back panel because it is dense. Food, notebook, marker, compass, and chemlights can live in a flat admin layer. Cordage, face paint, and other low-urgency tools can sit deeper. The poncho and bivvy should not be buried under hard goods, because rain and exposure problems usually arrive while the pack is still on your shoulders.
Fit And Weight Notes
The target is a bag that still feels fast. If the pack grows past the point where you would wear it all day, remove duplicates before removing medical or water. A second knife, extra gadgets, and oversized power banks usually lose to better water, a real headlamp, and a better packed med layer. Keep the exterior clean unless a pouch has a reason to be outside. Exterior clutter catches straps, telegraphs the load, and makes the pack wider than it needs to be. If you add mission-specific items, add them by replacing something in the same category rather than letting the pack grow without limit. The final check is simple: put it on, jog with it, get into a vehicle with it, and confirm you can still reach the medical and water without drama.
Builder Notes
The shared build attached to this guide is meant to be cloned and adjusted, not treated as a locked prescription. Prices change, stock changes, and some rows are planned research imports that should be reviewed before the SQL is committed. After cloning, start by confirming the pack size and then replace any item that does not fit your climate, body size, training level, legal environment, or mission. Keep the categories intact while swapping products: water stays water, medical stays medical, shelter stays shelter, and admin stays admin. That discipline is what keeps a pack from turning into a random wish list. If the builder shows a category with too many broad results, use the default query as a narrowing hint and choose the closest stocked equivalent.
Video References
This guide follows the category-first approach shown in Basic Assault Pack / Day Pack / 24h pack setup, the urban survival framing in Basics of Urban Combat Survival and Assault Pack Setup, and Mike Glover's mobility-bag doctrine in Mobility Go Bag Made By Special Operations Sniper Mike Glover. The useful lesson across all three is restraint: if the item does not support water, medical, calories, tools, comms, shelter, or admin in the next day, it belongs in a larger bag.
The Build
Guide- $117.83
- $189.00
- $42.00hydrationCamelBak Crux 3L Reservoir
- $17.00hydrationNalgene 32oz Wide Mouth Bottle
- $25.00water_purificationSawyer Mini Water Filter
- $34.99
- $8.99
- $46.50
- $5.50
- $18.00
- $25.00food_rationsGeneric 24 Hour MRE Entree and Ration Bar Kit
- $20.00food_rationsGeneric Electrolyte Drink Mix Packets
- $10.00
- $129.95
- $90.00
- $40.00
- $8.00admin_pouch5IVE STAR GEAR Ranger Pace Counter Beads
- $12.00
- $23.92comms_powerBaofeng UV-5R
- $26.00comms_powerAnker PowerCore 10000 Power Bank
- $35.00field_shelterGeneric USGI-Style Ripstop Poncho
- $20.00field_shelterSOL Emergency Bivvy
- $80.00field_shelterGeneric Packable Insulated Jacket
- $14.00
- $95.00
- $15.00admin_pouchGeneric Chemlights 10 Pack with Sharpie